Sunday, 30 August 2015

To see, or not to see.

August's Sprue Cutters' Union question: do you bother with details that will not be seen in the finished product or do you pour your heart and soul into each nook and cranny of the build?

Back in the early 70s, at the age of thirteen, I joined an IPMS chapter in Lancashire and discovered 'serious' modelling. One of the first things I learned was that real modellers aren't satisfied with a kit supplied seat and pilot, they must add cockpit detail. Long before resin and photo-etch aftermarket parts were available, I laboured away with styrene sheet and stretched sprue, adding sidewalls, joysticks, instrument panels and seat harnesses. Similar effort went into wheel wells and bomb bays. And sure enough, I'd glue the canopy on and add the undercarriage doors, and all that detail would disappear into the shadows. But, my conscience was salved just knowing it was there.

I didn't question this procedure for many years, and I don't consciously remember actually doing so, but at some point I stopped adding extra detail where it couldn't be seen. I didn't have the time, didn't really enjoy it, no-one really cared whether it was there or not besides me, and I preferred to focus on other aspects that I liked such as painting, decalling and weathering. By that time manufacturers were supplying a little more detail in the box anyway. I got lots more models finished and enjoyed it more.

And then, nine years ago, it changed yet again. I was approached by Model Airplane International to write a couple of articles for publication. Because every aspect of the builds was being documented, it was necessary to concentrate on the models' innards and then take giant high-res photos of them. Even though the extra work was invisible on the actual models, it had to be there for all to see in the pages of the magazine.

Today I'm a lot more relaxed about what to include. For instance on a recent build of the Revell 1/48 Stearman I omitted a handful of detail parts that simply served no purpose – they added nothing to the structural integrity of the kit and would have been completely closed up in the fuselage behind the engine. My general rule now is that if something can only be seen on the finished model using a flashlight and dental mirror, it can safely be left out. 

Still, I can't help but be impressed (and somewhat intimidated) by those talented modellers who do cram in every switch, cable and ignition wire, and who do it well – I may not emulate them, but I am inspired by them.
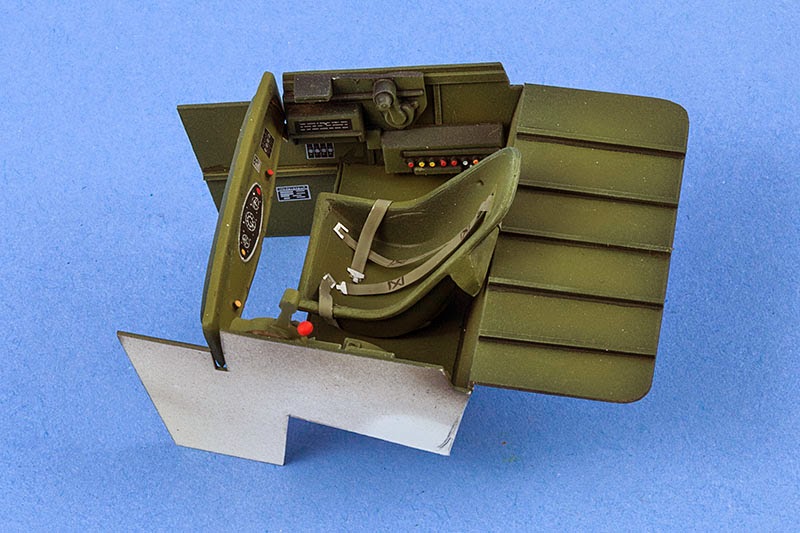
Now you see it
Now you don't
Other Unionist posts:-

Friday, 28 August 2015

What's on the box?

The resurgence of Airfix over the last few years has been due in no small part to its superb marketing and branding operation, in which the boxes themselves play a significant role. According to the Airfix Tribute Forum there have been at least sixteen distinct box styles, plus variations, since the brand began back in the 1950s. Having begun my modelling journey some time in the mid-60s, I could probably chronicle my life alongside the evolution of Airfix packaging (a future blog post, perhaps).

Classic Roy Cross B-17G 
The Airfix Blenheim Mk.IV box illustration, painted by Roy Cross
One of Roy Cross's best known Airfix box art images, the Avro Lancaster

For many, Roy Cross will always be the Airfix box art illustrator, and I certainly feel a strong affinity with his work – the stick of bombs falling from B-17G 'A Bit O'Lace', the blazing engine on the Lanc as it makes a sunset landing, an Israeli Mirage shooting up MiG-15s on the ground. However I also feel that the current red-box style with its computer generated imagery is probably the strongest and most effective branding that Airfix has yet achieved. Just as importantly, the quality of the new-tool kits inside now matches that of the box art, which has not always been the case. The majority of these new box top illustrations have been created by UK-based Adam Tooby.

On a forum recently I read a post dismissing Adam's artwork as 'just computer art', as if it had no artistic merit, or was simply generated with the click of a mouse (File> Filter> Create Hurricane II). A few months ago I got hold of a copy of Mr. Tooby's book, 'Warbirds – the Aviation Art of Adam Tooby', which goes a long way to dispelling any such misconceptions. The book is a superb collection of aircraft illustrations, some reproduced across two pages (the Lanc across a 3-page fold out), accompanied by informational text about each type. However there's also a section which delves into the artist's creative process which makes fascinating reading. Each of Adam Tooby's illustrations is rich in colour, beautifully composed and incredibly detailed.

Without wishing to sound too melodramatic, the art of Roy Cross defined a generation – of kit-building schoolboys, at any rate. Perhaps Adam Tooby's work is defining a new generation (or maybe it's the same one but now with expendable income and reading glasses).


The book is available directly from Adam Tooby's website, and he offers to sign copies too. (I'd have really liked that option but cheaped out, having found a retailer offering free shipping.)

Wednesday, 26 August 2015

Blitzbau Yak

It's been a while... over a year in fact, since I last posted here. In that time there have been a few completions which I'll post over the next few days and weeks. The most recent of these was a Blitzbau build of the AModel 1/72 Yak-18.

For those not familiar with the term, a Blitzbau (BB) is a start-to-finish kit completion within a 24-hour period. That's not 24 hours of build time, but a literal day in which inconveniences like eating and sleeping also have to be slotted in. The BB originated on the Unofficial Airfix Modellers' Forum (UAMF), and they're a lot of fun, with participants not only posting regular updates of their build but also their meals and preferred music. Extra cachet can be earned by the inclusion of a particularly awful clock in the build photos, as well as unusual mugs and beers.

Having failed to finish the last BB I attempted (a new-tool Airfix P-51D), I was determined not to make the same mistakes. Last time I was too precious about detailing and painting the cockpit, and on top of that took an extended (though very enjoyable) lunch-break on a pub patio with my wife and a steak sandwich – no such frivolity this time. The keys to finishing a BB build are to plan ahead by making sure all the paints and materials are on hand, the Dremel is charged, reference material is to hand etc. Choosing a simple paint scheme is also a major factor – we all know how long a complex masking job can take. Quick drying materials like acrylic or lacquer paints, and superglue with accelerator for filling, are a huge help. Start time was crucial; beginning at lunchtime gave me just enough time to get the paint on and a gloss coat, which could then be left to cure overnight; decals, flat coat and all the detail stuff could then be finished the next morning. And it requires a certain willingness to compromise, or at least take shortcuts, preferably in areas where it'll be least noticed.

The Yak kit had been in my stash for several years; taken out, examined and put quietly back on many occasions. It's a typical Amodel kit, with lots of flash, soft mouldings, no locating pins and a canopy of dubious clarity. The fit was terrible, especially on the underside where the wing met the fuselage. There was lots of filling and sanding throughout, but in the end I finished with about 10 minutes to spare. 

The finished model definitely wouldn't win any contests, but it's one less kit in the closet of shame. As always though, it leaves me wondering why, if I can finish a model in a day, do my regular builds take so long?


Tuesday, 29 July 2014

Under my skin

There are some aspects of this hobby that I really dislike. Masking canopies is one of them, and so is making seat harnesses. My most intense loathing though is reserved for photo-etch. It can't be sanded, paint won't stick to it, it bends at the slightest touch and the tiniest parts launch themselves into oblivion. So it was with some trepidation that I accepted a request from the editor of Airfix Model World to build the Eduard 1/72 strip-down Fokker. Apart from styrene wing spars, cowl, prop and a few odds and ends, the kit is almost entirely photo-etched brass. Fortunately it's superbly engineered and the problems I had were all self-induced: folding parts back-to-front, and knocking the model off the workbench for example. I can't honestly say I enjoyed the build, but it did overcome some of my fear of photo-etch. The full article is in the August 2014 issue.


Saturday, 19 July 2014

Japanese Hybrid

The trouble with writing a modelling blog is that, even if you're working on something almost every day, there really isn't much to report until a build reaches a significant stage, or it's finished. But this one's done, now: Dragon's 1/72 Ke-Nu. Like the real tank, Dragon's model is a hybrid of two of their Japanese armour kits, so there are lots of parts which don't get used. Everything went together really nicely. The DS tracks were great to work with and replicating the sag was very straightforward.

It was enjoyable to do an armour piece for a change, and it was equally nice to have the build published in the July issue of Airfix Model World. The magazine has quite specific writing criteria that took some getting used to, but they're a joy to work with – very professional, plus they actually pay in a timely manner. (Since I'm still waiting for several payments for articles published in SAMI, the earliest dating back to the September 2013 issue, I'm finding little motivation to write for them any more)


Friday, 23 May 2014

Fallacious Ford

Not quite a new build, this AMT 1/25 '32 Ford had been sitting unloved for years in my stash, until a Group Build on the Unofficial Airfix Modellers' Forum rekindled an interest. The concept was to build an aviation-themed car kit, and there were some really creative solutions. This particular kit was awful – soft mouldings, loads of flash, indifferent fit of parts – but I derived a perverse sense of enjoyment in building something other than a plane and totally spurious. I went with a 'yellow-wings' theme and scratch built a cockpit using sheet styrene and spares from an old Airfix 1/24 Bf109. The biggest challenge was the gloss paintwork – I simply don't know how you car guys get those rich, deep, mirror-like finishes. I used Tamiya spray-paints and they behaved superbly, which I then polished using Tamiya compounds. Unfortunately the application of U.S. markings necessitated a few coats of Future/Pledge, and that somehow seemed to take the edge off the factory finish I was going for. Still, I learnt a lot and am tempted to build another car (probably not an AMT kit, though).


Sunday, 18 May 2014

Eduard 1/72 Bf110E

Another couple of months have gone by without a post, but then again I haven't been at the bench much so not a lot to report. A full build article of the 1/72 Eduard Bf110E that I built a few months back has just been published in the June 2014 issue of Tamiya Model Magazine, and currently on the bench is the old (albeit in a new box) Airfix 1/144 Boeing 737.